")
Empathy mapping – What is it?
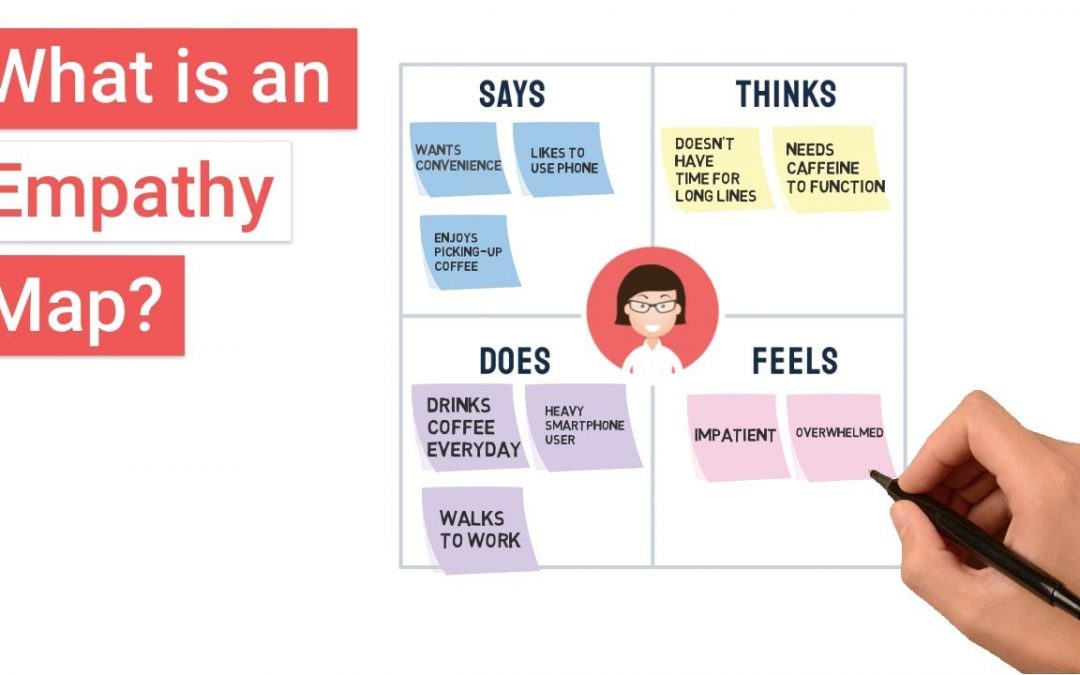
Empathy mapping articulates what you know about the emotional and mental state of your users. By externalizing all of this knowledge, you are able to create a shared understanding of their needs and how they will approach your product. A shared understanding of this will also aid in decision-making, team-wide throughout the development process.
Empathy mapping helps developers:
- Remove bias from designs
- Discover weaknesses in user research
- Uncover user needs that the user themselves may not even be aware of
- Understand what drives users’ behaviors
- Be guided towards meaningful innovation
Empathy maps can be very useful in internal communication and can help to get everyone talking about your product. They allow for a more comprehensive understanding of the users’ needs, which are critical to product development and future success. Often, if you have an empathy map you will know when certain functionality needs to be implemented, allowing for more appropriate and meaningful use of resources. Empathy mapping is also important because it allows us to understand how our users think.
An empathy map is a tool that helps you understand what your users want from your product. It should not be used as a substitute for user research or prototyping, but rather as an addition that helps inform and drive decisions towards better design and ideas.
Below are some examples of empathy maps. Each of these maps did not start with a concrete idea for the product. It was more of a process where they started with user research and discovered what the user was trying to do.
What are some advantages?
Empathy mapping offers many advantages in the design process due to its ability to drive coherence between all parties involved. The map will allow everyone on a team to share their ideas and ensure the design is creating value for users as opposed to just making it aesthetically pleasing but adding nothing real-world value. It also helps by providing an open-source document that allows users, analysts, and even stakeholders from other teams to collaborate on what they feel is best for customers.
Empathy mapping can also be a good tool to improve your decision-making. Your empathy map will show you what the users’ needs are, which is information that should be considered when solving design problems or making decisions. By taking the time to consider this aspect, it makes it easier for others to understand what your project is about and what things should be more important than others.
A disadvantage of using empathy mapping is that it can present you with an unbiased view of users’ needs and doubts about how you are treating them if you fail to consider their outside opinion.
One case in which empathy mapping can prove to be very useful is when brainstorming whole new ideas and concepts for your company. It promotes an open environment as it allows for everyone to share their ideas and interests in relation to the product. This can help you create a higher understanding of your target users, which will help in solving problems with the design.
A final disadvantage is that it may not have the best view on how widespread your product will be or the criticality of certain features. You may find that certain features are only important to a small niche section of users; simply creating an empathy map cannot solve this issue as it does not take into account user needs related to wider adoption.
How to Create an Empathy Map?
To start an empathy-mapping exercise, you’ll want your entire team to get together for a whiteboarding activity (virtual teams can do so by using virtual whiteboards). Before getting into empathy maps, you should have done some initial research into your target audience and have notes and ideally interviews from these folks. Make sure everyone has reviewed these. Having a baseline understanding of the target user is important before you begin.
Step 1: Determine your topic
For now, we’ll focus on the product rather than a particular feature. It could be an existing product or a new one. We will use the product as the lens to look at the user’s needs, their backstory, and so forth. It is important to be realistic as it helps you justify and prioritize the features of your product. The team already has an idea of what was planned for the product, so take a moment to get alignment on this vision. You’ll want to find alignment around what users really need and how they will benefit from this project.
Step 2: Take notes on your topic
The next step is to take notes and write down essential information about the person who is your user. What can you find? If you use usability testing to capture this data, you may end up with a lot of notes. If you don’t have access to your research results yet, note down some preliminary basic facts or general observations that you can use for parts of the map.
The map should be something that is concise, but long enough to get all the specifics down in one place. You may want to sketch keyboard shortcuts or drag-and-drop options for interactions. It will help later when trying to remember what things were important about each step during the user journey. You can use the research you did on the user to help with gathering this information. You may want to sketch out the workflow of a typical experience.
We recommend using more than just text in your map. For example, you might include screenshots of the page or even full-color wire-frame pages that are simple but clearly illustrate what you mean by each element.
Step 3: Group your elements into categories
This step is like organizing a closet or kitchen – figure out what parts go together by grouping them together into similar categories. A group is an area where topics connect, overlap, and can be seen as related ideas. Sometimes you might have concepts that don’t fit into any particular group but are still important. These can be places where you can make small notes on the map as to why this piece is important. It also lets you drop ideas/notes elsewhere if they don’t fit into the map.
In order to do this effectively, it is best that you sit together in real-time and discuss possible groups for each area of the map. That way you can create a shared understanding and language regarding the relationship between things in your map. You may then need to rearrange and cluster areas based on what groups stick out or users want. This is not a one-time process but something that will change as your research develops further.
Creating a shared understanding before mapping means that you can look back at the map and easily see how the groups connect. For each element, no matter what information you have discovered, think about the following questions:
How does this help users meet their needs?
What kind of emotions does it bring up? Or what problem would it solve?
In choosing which elements to go into detail for a particular group, try to think about the aspects that impact the majority of users. The goal is to keep it clear and concise so everyone involved in the project can read and understand what you mean.
Step 4: Add context to your groups
After you have outlined your groups, each group is going to need a little more explanation. It might help to get a second set of eyes on the map at this point to see if you’ve missed anything or asked any questions that could be answered with more information. You will also want to decide whether any of these elements are particularly important for your product. Identify the most important pieces and explain why they should be included in your product. Each group should have at least three things in it if you can manage it (a person, a problem, and a solution).
Step 5: Review and refine your map
Take a moment to review and ask yourself if you need more things for each group. Does the context make sense? Are there any holes in the logic that need to be filled in? It might help to invite a few people back in to go through the last part of the process. You may want to get more feedback from users once they know what you’re working on so don’t be surprised if you have some changes after this portion of your design process. However, it is still important not to distract yourself from the design work itself and put off this kind of refinement until later. It is easier to rip out elements if necessary rather than add new ones once you get into development.
Creating a map that is easy to understand and share outside of your team is important. Remember that the purpose of an empathy map is to show the perspective of the users. It should be designed to emphasize what elements are the clearest for them based on their needs. Think of this like a trip through your app – what is the easiest way to help someone find what they are looking for? The goal is not to make it look pretty but to present information in a way that aligns well with users’ understanding.
Empathy maps do take time, but once you start using them you’ll wonder how you ever got along without them! They are flexible, so they can evolve with your project’s needs.
Interested in reading more about website design? Website Design Mistakes and How to Avoid Them discusses the mistakes found in website design and how to avoid them.
 If you would like to discuss Your Logo with Mojoe.net or your website’s analytics, custom logo designs, social media, website, web application, need custom programming, or IT consultant, please do not hesitate to call us at 864-859-9848 or you can email us at dwerne@mojoe.net.
Recent Comments